Friday, November 28, 2014

Modern Bargello Quilt


I have a new tutorial up at Moda Bake Shop!   Check it out here
I have always loved the Bargello Quilt. This is a version of a simplified bargello - one with sashing to break it up a bit and give it a modern flair. 

We started with lots of practice on curves -  using graph paper.    My son loved helping me with this part.  


 Although the technique isn't quite the same as using the 'tubes' of fabric,  it still gives the practice of how you want your curve to flow.  

While I was planning the bargello I actually changed up the design many many many times.   I just wasn't happy with the look.    I think if I had a different set of fabrics or colours, I may have gone with my original design.    So, I simplified things again and went to my computer.  I used microsoft excel to create a basic idea of my bargello. 


Then I started messing around and adding my first idea -  just vertical sashing.   Wasn't pleased with that, so I added horizontal sashing in random places:   

I liked this idea, and will try it again in the future.  But for a tutorial I thought, how on earth am I going to keep this simple and doable for someone new? 

So I changed it to consistent sashing with rectangular blocks:
which I liked a lot too...but the squares seemed to work best this time!

I quilted the quilt with just wavy lines.  It was so freeing.   I was going fast, I wasn't measuring or marking.  Just 'driving' the machine.   So unlike my usual quilting.  I loved it. 


I love the watercolour effect of this line by Zen Chic called Figures.   It really worked well together.   The colours are gorgeous -   I love that salmon/coral!  


I used 'Suzie's Magic Binding' to create interest in the binding.  I think it looks fantastic!!!  


Quilted on my APQS Millennium using Hobbs 80/20 batting,   Superior Magnifico (navy) and Wonderfil Magnifico Decobob in the bobbin.

If you make one, I would love to see your version of it!    Enjoy your week!


Tuesday, November 18, 2014

Modern Landscape quilt

If you are visiting from SewSister's Blogathon Canada! Welcome!!

I recently worked on a King sized quilt top that was really fun to plan out and design.    The client was quite easy going with the quilting to put on the top - but specified that a tree off center was to be a feature on the quilt.   Usually a quilt top has blocks and boundaries to keep your design in line and contained.  This one, I figured to be more of a modern landscape.   

I planned to do organic flowing lines in the background with swirls  to show movment.     The bottom of the quilt,  brown prints,  indicated the ground, and so I quilted swirls, leaf shapes, pebbles and lines in a flowing, more dense design.   

The spruce tree required a bit more planning and practiceI did a google image search - continuous line drawing – spruce tree;   spruce tree drawings,  etc. to come up with five or six images that I could play around with.   I would sketch them out on a scrap piece of paper, and then decide if I could manage that type of sketch as a large scale drawing on a quilt.  After analyzing and coming up with two designs that I thought would fit well with the fabric selections in the quilt top  -   I forwarded these two images to my client and had her choose what style she would prefer for the top.   When that was decided, I did a little bit more sketching on my whiteboard and paper.   

Next up, I had to estimate a scale for the quilt-    off center and large enough to look like it was ‘part’ of the quilt.     I actually laid out the quilt top on my floor and used string first and then painters’ tape to place an outline of the triangular shape and vertical trunk of the tree first.   After a few shifts in location and sizes, I then added a few tape ‘branches’ to mark out the different layers of the branches.      The tape worked well – but it does come off easily.   I also used a marking pen to mark some of the branch layers

Quilting the tree was not as easy as I thought - after doing just a single outline, I realized that I would need to do a bit of thread ‘painting’ to give more texture.   When doing this type of quilting, it is really important to step back a few feet as well, to get the whole picture of what the ‘painting’ looks like.   I had to be careful not to do too much thread painting, to keep the quilt soft and pliable.  Using the machine, my nose is often about 6-8 inches away from the quilt top – and so I see every. single. stitch.   And that can make one a little neurotic.   ;-)
 Back of quilt - photo edited a lot to show the tree -  the backing is actually a dark vivid orange.
The end result photos were really hard to capture the design and the texture -  the backing colour was solid orange – anyone have tips on photographing orange? But I did want to share my thinking and quilting process with you -  maybe it can help you in a future quilt.  Some of the following photos have been edited, lightened, etc to show more detail of the stitching.

Batting - Quilter's Dream 100% cotton
Thread - Glide thread top,  Wonderfil Decobob bobbin

Friday, October 24, 2014

Tools I use for long arm quilting

I'm working on some of my '1 year later' newbie long arm quilting posts.   This is one of them -  tools I use.   I am a minimalist when it comes to supplies.  I dislike clutter and lots of 'stuff'.   So far, these are some of the tools that I find I use constantly, in addition to basics like thread, a few rulers, etc.   
Hope this helps anyone who is new to long arm quilting!  

Whiteboard.  This really helps me to practice some designs, doodle a sketch,  or just get a path of a design - something that will fill up a space without gaps or without getting trapped in a corner. 
 An enlarged tall table surface -  I made this with a sheet of plywood, a few layers of batting and some cheap cotton I found at Ikea.  I plunk it over top of my existing table top to make it a larger surface area and it is a perfect pressing surface and cutting table.  It slides around somewhat if I lean on it, but it doesn't flip or slide off.  It is heavy enough to not be a nuisance.  As well, it is a larger space to spread out a quilt to trim threads, remove lint, etc.  
 Saddle Stool -   This is height and tilt adjustable and I use it when I need to do some really finicky dense work or I made a huge error and need to spend 2 hours picking out stitches at my frame.    I love it, and recommend the bottom foot rest as well.   A saddle stool is not for everyone - it takes getting used to as it really is a saddle style.  You have to hike your hip and thighs over the middle section so that takes getting used to.   like a saddle!   I find my posture is excellent using this stool.   
 Television with good speakers.  I watch/listen to tv and music. Keeps things a bit more exciting in my studio! 
 Reading glasses.   After a year of quilting,  I realized that my eyestrain and drooping eyes were caused by the fact that I needed reading glasses -  and in developing news - probably a special prescription JUST for long arm quilting.  sigh.  I know.  It's the aging process.  Take good care of your eyes, and if those cheap readers at costco relax your eyes a bit when you are doing close up work -  use them.  Don't be stubborn and in denial like me. Trust me. 

 I had bobbins everywhere and finally figured out a good storage system for them.  I bought a fishing tackle organizer from Outdoor World for $3.00.  It keeps them perfectly organized. 
 A magnetic pin tray -  this is from an automotive store - it's for mechanics to hold car parts when they are working on vehicles.   This is awesome -  it sticks onto your frame magnetically and you can easily pin without worrying about the container flopping around.
 C- Clamps.  I'm sure you could find similar things at the local hardware store.   They are plastic C clamps which you clip onto your quilt rollers.   I use them to keep the edges of the quilt straight;  line up seams on a quilt, etc so that as I advance the quilt,  I can always line seams and edges up according to where the clamps are.  It really helps keep the quilt top straight.   See how the clamp in the above photo is on the roller?  It lines up with the seam between the taupe/blue fabric: -   so as I advance my quilt top,  I make sure it is always lining up with that seam.    Of course,  sometimes there is a variance if the piecing is way off!  
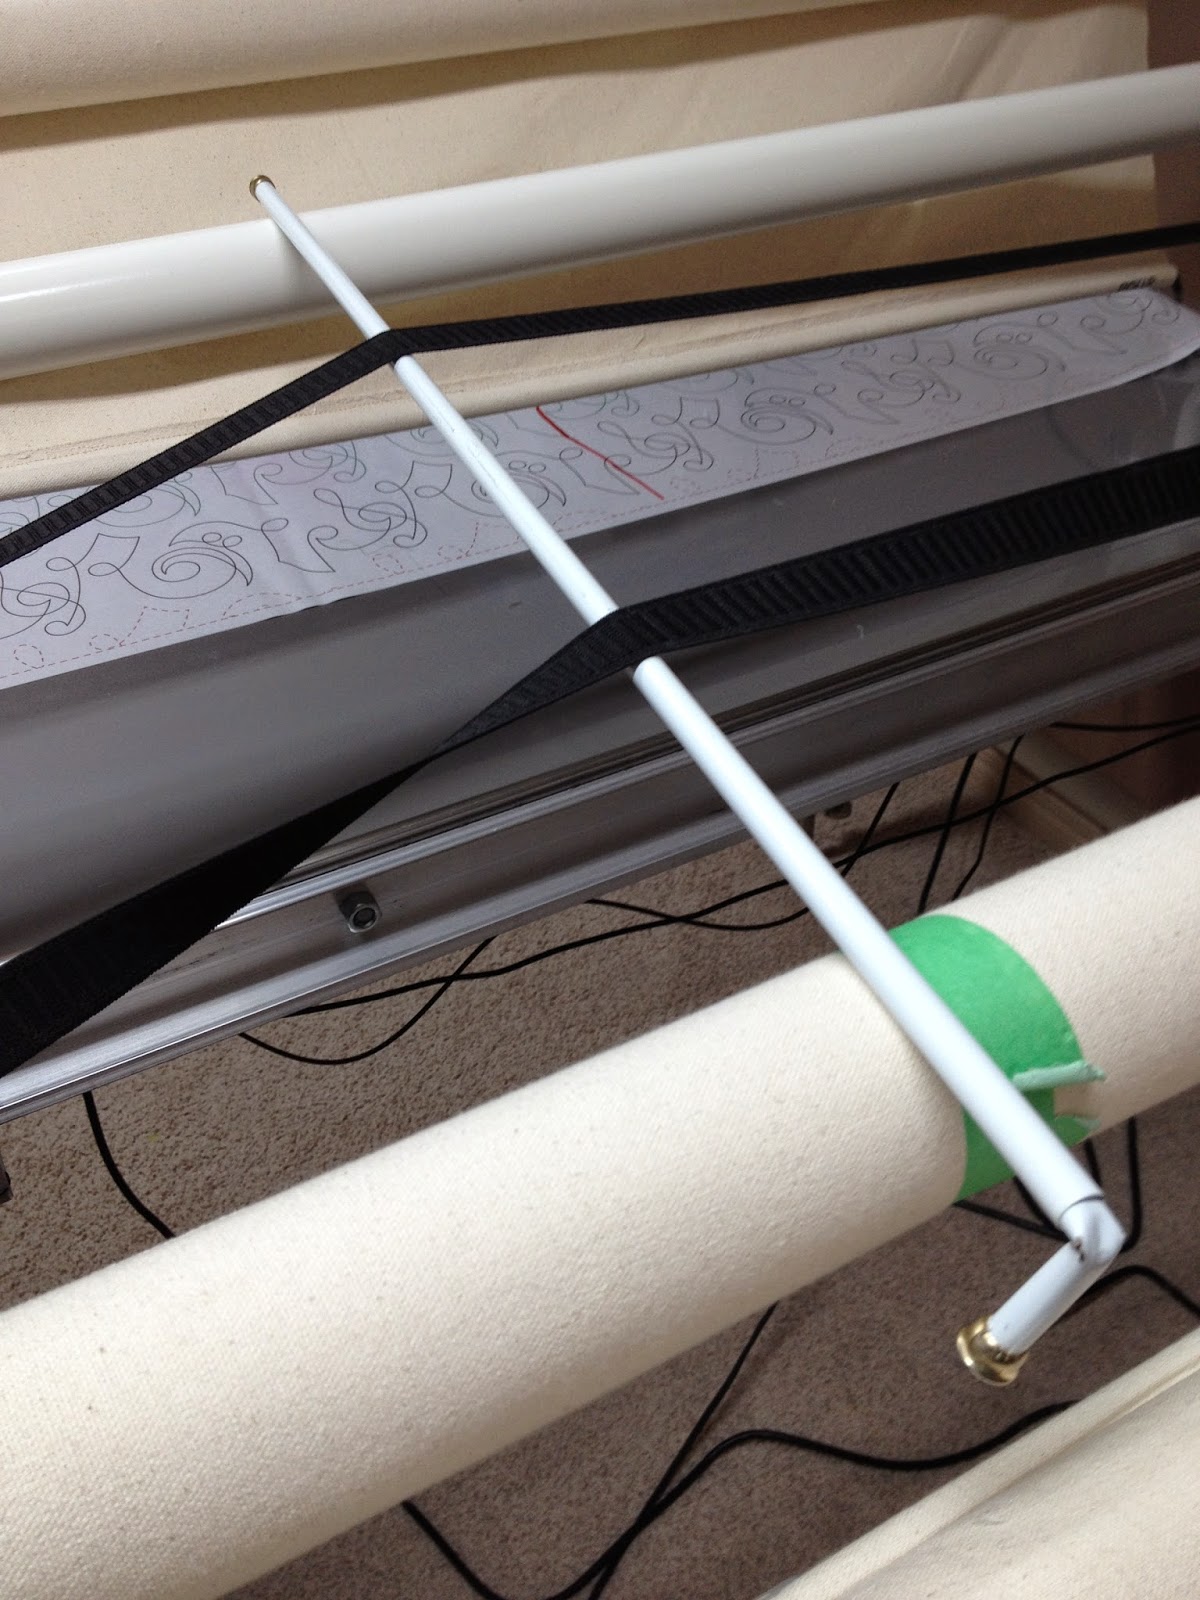
Cafe Curtain Rods (2)   I use these to hold my side clamps up a little higher.  This is especially helpful if my backing is pieced and floppy and the tension of the backing needs to be adjusted.   Some people use wooden yard sticks for the same purpose.  I will probably be doing the same soon as sometimes the rods roll around and off the frame, and make metal clanging noises as they bounce off the frame and onto the floor. (little annoyances) 
 Basic tools -  straight ruler - I use this one all of the time. It's more than awesome.   Tweezers.  Marking pens and pencils.  Still on the hunt for the perfect marking pen.   
 I've posted about this $1 tool before.  It is so so awesome.   Removes threads from your design wall. Threads from your carpeted floor (I toss on the floor)  and even stray threads from your quilt top after you have frogged for 2 hours.   (frogging means ripping out threads  rip it rip it)
 Snips - I bought these for about $25 or $30 and though I gulped at the price, they are well worth the investment.   They trim very close to the quilt surface and are super easy to use.  Love these!
 Clock - you can lose track of time in the studio!
 I use this side lamp for the majority of my quilting if I am working from the front of my machine.   I quilt in the dark most of the time with this light shining along the surface of the quilt.   I am going to be making this sidelight tutorial from Jamie Wallen as soon as I can find the time. 
 A piece of plexiglass is fabulous for auditioning designs on top of the quilt!
 Gum.  Candy is a no no for me, so gum really helps to keep me going.  
 Garbage bins -  everywhere.  I have 4 in my studio.  
 I haven't needed fuses in a long while, but these are very necessary in your first few months of long arm quilting.
 This tension gauge is probably unnecessary, but it really takes the headache out of figuring thread tension for me.  If I know my bobbin tension is set at my sweet spot, then I only have to worry about adjusting my top thread tension! 

See that little felt circle on the side of my machine?  Best hack ever.  I bought sticky felt furniture/floor protectors pads.   Stuck one onto the side of my machine. Now I have a very convenient spot for my needles when I am burying threads! 

Friday, September 19, 2014

Modern Custom Quilting

   before quilting


One of my clients brought this Sarah Fielke Millefiori Mystery Quilt  for quilting. Pattern available on here.
My client is a beginner quilter and my eyes popped out when I saw this photo in my email.   A beginner quilt?   Look at all of those hand applique'd circles!!  

Wonderfil Master Quilter thread in white
Hobbs 80/20 batting

I densely quilted around all of the larger printed circles, and then stitched along the printed curves of the circles so that the 'star' shape popped out someone.  The dense quilting also allowed the circles to pop.   For some reason I love to emphasize the piecing this way, as I did with the little white squares as well. I love the texture that it creates.


 The border was quilted with 1'' lines.
 Sigh.   I could look at this all day.   I love how the circles pop!

 I stitched in the ditch these strip blocks, and they pop even more.  

My clients inspire me.   That's all.